Shopping Cart
0 item(s) - USD 0.00- 5W Resistor (6)
- Arduino Development (65)
- Audio (8)
- Batteries (17)
- Cable & Wire (39)
- Capacitors (41)
- Charger (7)
- CNC Machine (4)
- Connector (26)
- Connector (4)
- Connector & Sockets (3)
- Crystals / Oscillators (9)
- DCA Professional Power Tools (0)
- Development Tools/ Programmers (10)
- Digital Oscilloscope (0)
- Display (67)
- Domino (5)
- Driller (16)
- ECOSPARKS PRODUCTS (0)
- Electrical Products (1)
- Ferrit (1)
- GPS Module (5)
- GSM Module (8)
- Headers (15)
- Heat shrinkable tubing (7)
- IC-Driver (17)
- IC-Microcontroller (31)
- IC-OpAm (13)
- IC-Timer (5)
- Inductors SMD (0)
- Inductors/Coils/Chokes (16)
- Integrated Circuits ( ICs ) (1)
- Max Family (7)
- Micro SD (7)
- Module Bluetooth/ Bluetooth (5)
- Module Relays (6)
- MosFet & Fet (15)
- Motor Pump (5)
- Optical Sensor (11)
- Optocouplers (3)
- Other Products (1)
- Over Voltage / Current (11)
- PCB (16)
- Potentiometers / Variable Resist (16)
- Power Supply (16)
- Projects Box (1)
- Raspberry Pi (32)
- Regulators (20)
- Relays (11)
- RePair Battery LapTop (2)
- Resistor-Network (3)
- Resistors (52)
- RF IC, Module (13)
- ROBOTIC (55)
- Semiconductors (0)
- Sensors / Transducer (86)
- Service and Repare (0)
- Smart Home (2)
- Socket-IC (10)
- Solar Panel (4)
- Solder (8)
- Soldering Tool (28)
- Specialized Function IC (10)
- surface mount (SMD) (35)
- Switches, Key Pad (25)
- Terminal block (11)
- Test & Measurement (21)
- Testboard (6)
- Tools & Supplies (57)
- Transistor (32)
- Triac (3)
- USB Connector (10)
- USB to Serial (13)
- WiFi Module (13)
- Wire Termial (15)
- Diodes (20)
- IC-Logic Family (29)
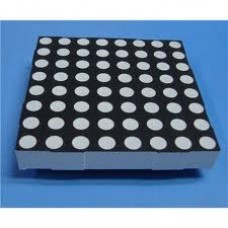
Dot Matrix 8x8
Availability: In Stock
Add to Compare
Dot Matrix Led 8x8 & MAX 7219
In this article we will discuss about functions of MAX 7219, created by the Maxim company. This IC (Integrated Circuit) could help as, when we whant to work with digits and LEDs.
At the designing of this IC,was wanted fulfillment of the following functions:
- Control of eight digits, made with LED technology;
- Common cathode configuration;
- Communication via SPI, with a slew-rate limited on the segment driver, to reduce EMI (Electromagnetic Interference).
Trough video below I whant to demonstrate that things can be put in motion.
http://youtu.be/1Vn4HXSKRpc
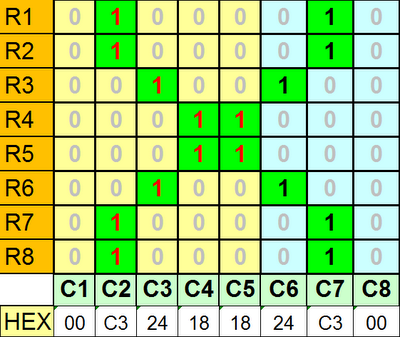
In a dot led matrix display, multiple LEDs are connected together in row and columns. This connection is established to reduce the number of pins needed to manipulate them.
In the current article we will use a 8x8 LED matrix, which would require 64-pin I/O, one for each pixel.
Connecting all the anodes together (from R1 to R8) and cathodes in column (from C1 to C8), the required number of I/O pins, is reduced to 16. Each LED is accessed by its row and column number.
In the figure below, if R5 is in in 1 logic and C3 is in 0 logic, the LED on line 5 column 3 will be turned on.
The characters will be displayed by fast scanning of each row and column.
The table below shows the logic levels, which are applied to rows and columns, to display the character "X". At the bottom of the table we have the hex code for it.
Serial-Data Format (16 Bits):
For the MAX7219, serial data at DIN, sent in 16-bit packets, is shifted into the internal 16-bit shift register with each rising edge of CLK regardless of the state of
LOAD. For the MAX7221, CS must be low to clock data in or out. The data is then latched into either the digit or control registers on the rising edge of LOAD/CS.
LOAD/CS must go high concurrently with or after the 16th rising clock edge, but before the next rising clock edge or data will be lost. Data at DIN is propagated
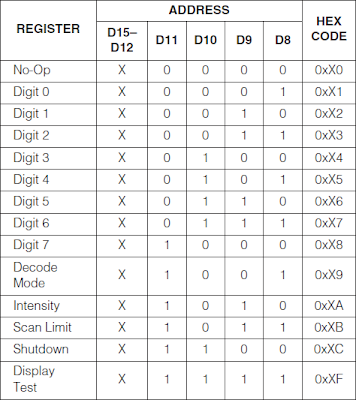
through the shift register and appears at DOUT 16.5 clock cycles later. Data is clocked out on the falling edge of CLK. Data bits are labeled D0–D15 (picture from above). D8–D11 contain the register address. D0–D7 contain the data, and D12–D15 are “don’t care” bits. The first received is D15, the most significant bit (MSB).
Register Address Map:
For more details, please study the MAX7219 datasheet.
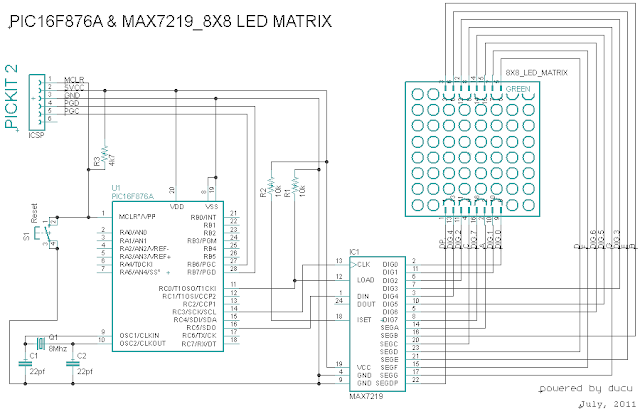
Circuit Diagram:
Difficulty level of the electronic scheme, is low. Microcontroller used in the current project is PIC16F876A, this MCU supports SPI communication.
S1 is the master reset button, R3 is the resistor of pull-up button.
Cristal quartz by 8 MHz, is used.
R1 represent the pull-up resistor for "LOAD/CS".
R2 adjusts the current on the segment, for all digits.
Our matrix LED 8x8 is in common catode configuration.
The electronic scheme is built in Eagle Cad, free version:
Software:
The program is written in mikroC Pro for PIC 2011 (version v4.60). To store the entire alphabet and symbols, the column 0 and 7 are not used, in case you opt for a microcontroller with more RAM, you can add columns 0 and 7 and you will enjoy the entire matrix.
/*
'*******************************************************************************
'  Project name: PIC16F876A & MAX7219 For 8x8 LED Display
'  Description:
'          Trough the current experiment we wish to succed the next task:
'          Display on 8x8 Led matrix, the alphabet. The sequence between letters,
'          will have one second delay.
'  Written by:
'          Mark &
'          Aureliu Raducu Macovei, 2011.
'  Test configuration:
'    MCU:                        PIC16F876A;
'    Test.Board:                 WB-106 Breadboard 2420 dots;
'    SW:                         MikroC PRO for PIC 2011 (version v4.60);
'  Configuration Word:
'    Oscillator:                 HS (8Mhz)on pins 9 and 10;
'    Watchdog Timer:             OFF;
'    Power up Timer:             OFF;
'    Browun Out Detect:          ON;
'    Low Voltage Program:        Disabled;
'    Data EE Read Protect:       OFF;
'    Flash Program Write:        Write Protection OFF;
'    Background Debug:           Disabled;
'    Code Protect:               OFF
'*******************************************************************************
*/

// For more space, we don't need byte 0 and byte 7.
// We have stripped them out, if/when we have a need and a bigger PIC,
// then we can put them back if we want.

// Here we define row values for each of the six columns corresponding to the
// Alphabet, from  A through Z.
unsigned const short Alphabet[156]={
                                     0x7f, 0x88, 0x88, 0x88, 0x88, 0x7f,  // A
                                     0xff, 0x91, 0x91, 0x91, 0x91, 0x6e,  // B
                                     0x7e, 0x81, 0x81, 0x81, 0x81, 0x42,  // C
                                     0xff, 0x81, 0x81, 0x81, 0x81, 0x7e,  // D
                                     0x81, 0xff, 0x91, 0x91, 0x91, 0x91,  // E
                                     0x81, 0xff, 0x91, 0x90, 0x90, 0x80,  // F
                                     0x7e, 0x81, 0x81, 0x89, 0x89, 0x4e,  // G
                                     0xff, 0x10, 0x10, 0x10, 0x10, 0xff,  // H
                                     0x00, 0x81, 0xff, 0xff, 0x81, 0x00,  // I
                                     0x06, 0x01, 0x81, 0xfe, 0x80, 0x00,  // J
                                     0x81, 0xff, 0x99, 0x24, 0xc3, 0x81,  // K
                                     0x81, 0xff, 0x81, 0x01, 0x01, 0x03,  // L
                                     0xff, 0x60, 0x18, 0x18, 0x60, 0xff,  // M
                                     0xff, 0x60, 0x10, 0x08, 0x06, 0xff,  // N
                                     0x7e, 0x81, 0x81, 0x81, 0x81, 0x7e,  // O
                                     0x81, 0xff, 0x89, 0x88, 0x88, 0x70,  // P
                                     0x7e, 0x81, 0x85, 0x89, 0x87, 0x7e,  // Q
                                     0xff, 0x98, 0x98, 0x94, 0x93, 0x61,  // R
                                     0x62, 0x91, 0x91, 0x91, 0x91, 0x4e,  // S
                                     0xc0, 0x81, 0xff, 0xff, 0x81, 0xc0,  // T
                                     0xfe, 0x01, 0x01, 0x01, 0x01, 0xfe,  // U
                                     0xfc, 0x02, 0x01, 0x01, 0x02, 0xfc,  // V
                                     0xff, 0x02, 0x04, 0x04, 0x02, 0xff,  // W
                                     0xc3, 0x24, 0x18, 0x18, 0x24, 0xc3,  // X
                                     0xc0, 0x20, 0x1f, 0x1f, 0x20, 0xc0,  // Y
                                     0xc3, 0x85, 0x89, 0x91, 0xa1, 0xc3,  // Z
                                     };

 unsigned const short Symbols[114]={
                                    0x00, 0x3c, 0x42, 0x81, 0x00, 0x00,   // (
                                    0x00, 0x00, 0x81, 0x42, 0x3c, 0x00,   // )
                                    0x00, 0x00, 0xff, 0x81, 0x00, 0x00,   // [
                                    0x00, 0x00, 0x81, 0xff, 0x00, 0x00,   // ]
                                    0x00, 0x18, 0xe7, 0x81, 0x00, 0x00,   // {
                                    0x00, 0x00, 0x81, 0xe7, 0x18, 0x00,   // }
                                    0x00, 0x18, 0x24, 0x42, 0x81, 0x00,   // <
                                    0x00, 0x81, 0x42, 0x24, 0x18, 0x00,   // >
                                    0x00, 0x03, 0x0c, 0x30, 0xc0, 0x00,   // /
                                    0x00, 0xc0, 0x30, 0x0c, 0x03, 0x00,   // \
                                    0x00, 0x00, 0x00, 0x00, 0x00, 0x00,   //
                                    0x00, 0x00, 0xfd, 0xfd, 0x00, 0x00,   // !
                                    0x60, 0x80, 0x8d, 0x8d, 0x90, 0x60,   // ?
                                    0x42, 0x24, 0xff, 0xff, 0x24, 0x42,   // *
                                    0x24, 0xff, 0x24, 0x24, 0xff, 0x24,   // #
                                    0x62, 0x91, 0xff, 0xff, 0x91, 0x4e,   // $
                                    0x66, 0x99, 0x99, 0x66, 0x09, 0x00,   // &
                                    0x42, 0xa4, 0x48, 0x12, 0x25, 0x42,   // %
                                    0x20, 0x3f, 0x20, 0x20, 0x3e, 0x21,   // pi
                                    };

// Serial 8x8 Matrix Display connections.
sbit Chip_Select at RC0_bit;
sbit Chip_Select_Direction at TRISC0_bit;
// End Serial 8x8 Matrix Display connections.

// Here we set the configuration of max7219.
void max7219_init1()
{
Chip_Select = 0;       // SELECT MAX
SPI1_write(0x09);      // BCD mode for digit decoding
SPI1_write(0x00);
Chip_Select = 1;       // DESELECT MAX

Chip_Select = 0;       // SELECT MAX
SPI1_write(0x0A);
SPI1_write(0x0F);      // Segment luminosity intensity
Chip_Select = 1;       // DESELECT MAX

Chip_Select = 0;       // SELECT MAX
SPI1_write(0x0B);
SPI1_write(0x07);      // Display refresh
Chip_Select = 1;       // DESELECT MAX

Chip_Select = 0;       // SELECT MAX
SPI1_write(0x0C);
SPI1_write(0x01);      // Turn on the display
Chip_Select = 1;       // DESELECT MAX

Chip_Select = 0;       // SELECT MAX
SPI1_write(0x00);
SPI1_write(0xFF);      // No test
Chip_Select = 1;       // DESELECT MAX
}

// This is write Byte function.
void Write_Byte(unsigned short myColumn, unsigned short myValue)
{
 Chip_Select = 0;       // select max7219.
 SPI1_write(myColumn);  // send myColumn value to max7219 (digit place).
 SPI1_write(myValue);   // send myValue value to max7219 (digit place).
 Chip_Select = 1;       // deselect max7219.
 }

// This is clear matrix function.
void Clear_Matrix(void)
{
unsigned short x;

for(x=1;x<9;x++)
{
  Write_Byte(x,0x00);
  }
}

void Write_Char(char myChar)
{
unsigned short Column, Start_Byte;
// We will use only uppercase characters, so we will start from 65
// (look at the ascii chart), with an offset of 6, becouse we are using only 6
// bytes for each character.

// Clear the display first.
Clear_Matrix();

// The next line defines our byte, from which to start the array.
Start_Byte = (myChar - 65) * 6;     // 65 represents the letter "A" in ASCII code.

// We are using only columns from 2 through 7 for displaying the character.
for(Column=2;Column<8;Column++)
{
  Write_Byte(Column, Alphabet[Start_Byte++]);
  }
}

// This is write char function.
void Write_Symbol(char mysymbols)
{
unsigned short Column1, Start_Byte1;
// We will use only uppercase characters, so we will start from 65
// (look at the ascii chart), with an offset of 6, becouse we are using only 6
// bytes for each character.

// Clear the display first.
Clear_Matrix();

// The next line defines our byte, from which to start the array.
Start_Byte1 = (mysymbols-0) * 6 ;

// We are using only columns from 2 through 7 for displaying the character.
for(Column1=2;Column1<8;Column1++)
{
  Write_Byte(Column1, Symbols[Start_Byte1++]);
  }
}

// Here we have the main function.
void main()
{
unsigned int x,y;

Chip_Select_Direction = 0;    // Set RC0 pin as output.
SPI1_init();                  // Initialize SPI1 module.

max7219_init1();              // initialize  max7219.

do                            // infinite loop.
{
  // You can write the characters this way, one at a time.

  /*
  Write_Char('R');
  Delay_ms(1000);
  Write_Char('A');
  Delay_ms(1000);
  Write_Char('D');
  Delay_ms(1000);
  Write_Char('U');
  Delay_ms(1000);
  */
  // or

 for(x=65;x<=90;x++)    // Increment with 1, from 65 until 90.
  {
   Write_Char(x);
   Delay_ms(1000);      // This is our delay, between two consecutive character.
   }

  Clear_Matrix();       // Clear the Matrix display;
  delay_ms(500);

  for(y=0;y<=18;y++)
  {
   Write_Symbol(y);     // This is our delay, between two consecutive character.
   Delay_ms(1000);
   }

  }while(1);            // do forever.
}
Write a review
Your Name:Your Review: Note: HTML is not translated!
Rating: Bad Good
Enter the code in the box below:
Cambodia Electronic Source © 2025


-80x80.jpg)


