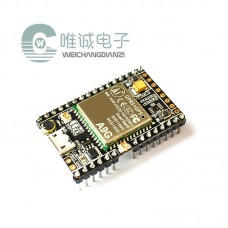
Description
- The A9G development board is a multi-functional development board based on A9G GPRS / GSM + GPS / BDS module that can be used to verify the basic communication functions and peripheral functions of the A9G module.
- A9G development board with the basic phone / SMS, GPRS networking communications, GPS / BDS dual-mode positioning.
- A9G development board contains a lithium battery charging management, microphone, speaker interface, USB communication interface, multiple user keys / led, TF card slot, acceleration sensor, SPI interface, I2C2 interface, ADC interface.
- Support an external 30W / 200W camera on A9G development board camera expansion board,
- Support an external conventional slot machines on A9G development board slot machine expansion board.
Possible application:
- Vehicle immobilizer using GPRS + GPS, as well as accelerometer.
- Remote monitoring intercom using GSM and microphone / speakers
- Smart watch with 1.54 “capacitive touch screen using GPRS / GSM + GPS
- Use GPRS / GSM + GPS, heart rate sensor, 1.54-inch capacitive touch screen monitor the elderly care
- Remote monitoring camera using GPRS + TF + camera extension board
- Wechat payment slotting scheme using slot extension board
- Custom devices based on Lua programming using onboard functions
Package of development board
- Main development board, accelerator IC is not placed on board.
- GPS/GPRS antenna, and GPS/BGS antenna.
Quick Start Guide
Basic debugging: wiring
- Development board using the AT firmware, when used in debugging 4-wire connection usb-ttl, connected to the computer debugging: VUSB → 5V; GND → GND; AT_TX → RX; AT_RX → TX;
- Or use the USB power supply, and then another three lines GND → GND; AT_TX → RX; AT_RX → TX;
- Or lithium battery VBAT → (3.3v-4.2) V; GND → GND; AT_TX → RX; AT_RX → TX; (VBAT power supply, need to press power_key button for about 2s)
Power-on
- A9G development board can use lithium battery or USB power supply.
- Power 1 ~ 2S module automatically run, this time the serial port will automatically output information. The entire power to the development board to work properly does not require any operation.
- To reset, press the Rst_Key button.
- The module enters AT command mode by default.
Initilization
- Under normal circumstances, the module power-on initialization is completed flag is + CIEV: READY, the actual module at initialization time requested data from the base station, will issue the date, time zone and time zone information, due to network reasons, will READY After the output. Of course, after the READY appears, it means the module power-on initialization is completed.
Auto-Tune Baudrate
- A9G has a baud rate adaptive function, the default baud rate is 115200. In the module initial power-on, you can modify the module’s baud rate. For example, my MCU baud rate is 9600, then the module just power up, send a command AT (not limited to this command, only to adjust the baud rate), the module will automatically adjust the wave Special rate to 9600.


